Event Inspector
You can open the event inspector from the calendar by double-clicking an empty spot in the event cell, or by clicking the info icon (the “i”) in the upper-right corner of the event cell.
The event inspector is a summary of all details of the event and the event group it belongs to:
- The inspector consists of different tabs.
- On the left of the inspector, you see the event structure of the event group to which the event belongs.
-
The name of the event (or event group) that has the focus appears in the header of each tab, together with the date(s), location(s), status and profile:
- You can edit the name of the event or event group by double-clicking it.
- Double-click the date and locations to edit them, but this can only be done for events.
- You can change the status and profile by clicking them and then choosing a different option from the drop-down menu.
Remark
- To change these data you must have the correct permissions to edit the event.
- You’ll see “n/a” (not applicable) beside the status or profile of an event group if all events in the group don’t have the same status or the same profile.
Navigating through the Event Group§
The event for which information appears on the tabs of the inspector, is the event whose text is red in the event structure at the left. We call this event the focus of the inspector.
An event group can also be the focus of the inspector. This way, you can enter details for all events in the entire event group simultaneously (see below).
When opening the event inspector for an event that belongs to a production, the focus will be the production by default. If the opened event doesn’t belong to a production, the focus will be the event itself. A Yesplan administrator can determine that the focus is always on the event when opening the inspector, irrespective of whether the event belongs to a production or not. The parameter “Always open event inspector with focus on” can be set in the System Preferences.
By clicking an event or event group in the event structure at the left, you shift the focus of the inspector. This allows you to navigate between the different events and event groups that belong to the same event structure.
Tabs§
A Yesplan administrator can add custom tabs in addition to the system tabs (“Info”, “Schedules”, “Location”, “Team”, “Resources”, “Tasks”, “Prices”, “Contacts”, “Attachments”, “History”, “Reports” and “Permissions”). Custom data fields, which are also set by an administrator, appear on these tabs. However, you can also display custom data fields in the right column of several system tabs. An administrator can hide one or more tabs from certain users. As a consequence, it’s possible that you can’t see all tabs that are mentioned.
Tip
In user settings you can set which tab will appear automatically when you open the inspector. Go to “User Settings” > “User Preferences” and you will be able to select the tab from the drop-down menu for “Always open event inspector from tab”.
Below, you will find the contents and functioning of each of the system tabs. After that, you can read more about how custom data works.
Info§
This tab only contains one fixed field with the Yesplan ID of the event or event group that has focus. All the other fields are custom data fields and are created by an administrator.
Schedules§
The left column of this tab shows the schedule of the event or event group that has focus. If the focus is on one single event, then the content and functioning of this tab are identical to the schedule popover in the calendar.
Tip
- See Event schedule for more information on the content and operation of the schedule popover.
- Read more about how to enter times quickly and easily.
If the focus is on an event group, then you see a summary of the schedules of the entire event group. This summary consists of a common schedule (the elements that are identical for the entire group) and a list of the separate schedules of all events in the group:
- In the common schedule, only those schedule items appear that also occur in the schedules of all underlying events:
- Schedule items are common if they have the same hour and description.
- If other schedule items occur on certain events in addition to the common schedule items, then the action “Expand Only Events and Groups with Additional Schedule Items” appears. Clicking this will expand the events with non-common schedule items.
-
In the schedules of the separate events, a round icon appears next to each schedule item, which indicates how often that schedule item occurs in the other events of the event group that has focus:
- The schedule items that are completely common (and thus also appear in the common schedule) appear in gray and have a round icon that is full (the inside is colored).
- The schedule items that are completely unique for the event have a round icon that is completely empty (the inside is transparent).
- The schedule items that are common for some events have a round icon that is partially filled.
- In the popover that appears when you hover the cursor over the round icon, you will see a list of events in which this schedule item also appears.
You can add and edit schedule items in the same way as described for the schedule popover in the calendar. If you add schedule items while the focus is on an event group, then you add this schedule item to all underlying events. In other words, you create a new common schedule item.
When copying and pasting, you can apply a complete event schedule to a different event in the same group.
Attention
- When pasting, you delete the existing event schedule items. If you paste on a group level (the focus is on an event group), this is the same as pasting on all underlying events.
- If it isn’t possible to delete certain schedule items of an event (because resources are still booked on that schedule item), then you can’t paste a schedule on the event and this action won’t be active.
By selecting multiple schedule items (via the checkboxes on the left in the list), you can delete multiple schedule items simultaneously via the context menu.
Location, Team and Resources§
The “Location”, “Team” and “Resources” tabs work similarly: they are tabs where you manage the event’s resources. The difference is that the “Location” tab only concerns the location(s), “Team” only concerns human resources and “Resources” concerns all resources (including locations and human resources).
Just like the Schedules tab, the left column of this tab displays the resources that were booked on the event that has the focus. If the focus is on one single event, we see the bookings on that event. If the focus is on an event group, you see a summary of the bookings for the entire group. This summary consists of the common bookings for the group and a list of every separate booking per event in that group.
- For common bookings of the group, you only see the bookings that occur in all underlying events. Bookings are common if they concern the same resource and the same number. Here, you also see the number of times that these resources are booked in the group, which represent the number of events. For example, an event group with five events for which two stagehands are booked each time will appear as ‘(5x) Stagehand x 2’.
-
If separate bookings occur on certain events in addition to the common bookings, then the action “Expand Only Events and Groups with Additional Resources” appears. Clicking this will expand the events with non-common schedule items. In the list of bookings on the separate events, a round icon appears for each booking, which indicates how often that resource occurs in the other events of the event group that has focus:
- The resource bookings that are completely common (and thus also appear in the common list) appear in gray and have a round icon that is full (the inside is colored).
- The resource bookings that are completely unique for the event have a round icon that is completely empty (the inside is transparent).
- The resource bookings that are common for some events have a round icon that is partially filled.
- In the popover that appears when you hover the cursor over the round icon, you will see a list of events in which this resource booking also appears.
The prices of resource bookings can appear including or excluding VAT. To switch between displaying with or without VAT, you can choose the desired option at the top of the tab.
Tip
You can book resources per event, but also for an entire event group. Read more about this on the page about Resource Bookings.
Tasks§
On this tab, you see the tasks of the event that has focus. You can add new tasks to an event and delete existing tasks.
You can also assign tasks to an event group. These tasks are part of the event group and don’t appear on underlying events in that group.
Prices§
This tab contains a summary of the costs and proceeds of the event that has focus. The cost, selling price and profit margin of all resource bookings are added up per resource group. You also see the net total, gross total and the diverse VAT totals.
The prices that appear under each resource group can be shown including or excluding VAT. To switch between the appearance with or without VAT, you can choose the desired option at the top of the tab.
Via this tab, you can also book an ad hoc financial resource (only for an event). To do this, click “Add an Amount”.
Tip
Read more about booking and managing resources.
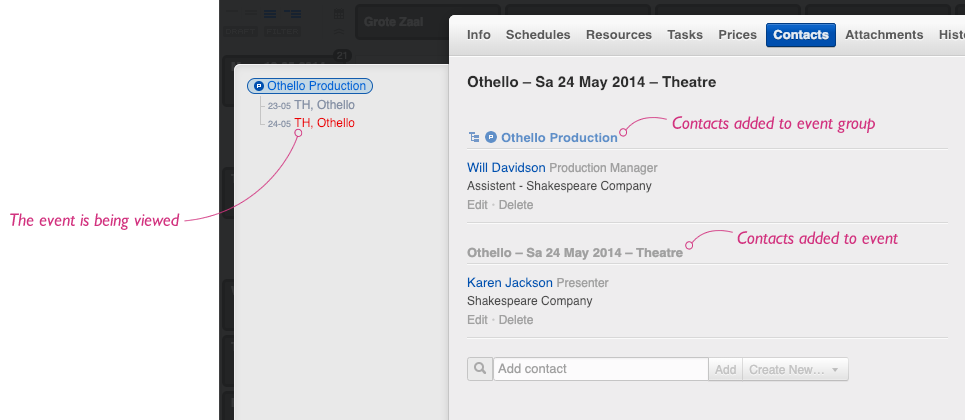
Contacts§
In the left column of this tab, you see the contacts that were booked on the event that has focus. You can book contacts both on an event and on an event group. Contacts that you book on an event group also appear on underlying events of that group.
You can sort contact bookings in this tab in the order of your choice. You do this by dragging a contact to the desired position.
Remark
You can only drag contacts within their own list. A contact that was added to an event group can’t be placed amongst those added to the event itself.
Attachments§
This tab displays the attachments of the event that has focus. You can add new attachments to an event and delete existing ones. You can also assign attachments to an event group. These attachments then also appear on underlying events in that group.
You can copy an attachment’s link to the clipboard, e.g. to share the link with others.
Warning
The maximum file size for uploads in Yesplan is 15 MB.
By default, attachments and other files saved in Yesplan can only be accessed by people who have a Yesplan user profile. However, you can also make files accessible externally. In that case, everyone who has a link to a file can open the file without having to sign in to Yesplan first.
History§
Under “System History”, this tab displays a list of all updates related to the event that has focus:
- Updates for changes implemented through the Excel Add-in contain the expression “via Excel Add-in” (e.g. ‘Anne Grant, via Excel Add-in’).
- If you’re viewing the history of an event group, you’ll also see the updates of underlying events.
Remark
The tab doesn’t always show every update:
- An update will no longer appear if the event took place at least two years ago and the action was executed more than two years ago. The update will never appear in the tab again, even if you move the event to a more recent date afterwards. You can still download the complete list of updates per year in “System Settings” > “Audit” > “Updates”.
- An update only contains values of system fields and custom data fields that you’re allowed to view. See Visibility of Custom Data and Granting Permissions for more information.
In addition to the system history, which appears automatically, you can also add entries to the history of an event or an event group. The items that you add to an event group are part of the group and don’t appear on underlying events.
Reports§
Reports that you generate on an event only appear on that event. Reports that you generate on an event group appear only on that event group.
Permissions§
This tab contains the permissions applicable to an event, and they are completely adjustable for users that have the correct permissions. Every event and every event group has an owner and matching specific permissions that are applicable to all users. For an extensive summary of the permissions, we refer to the Permissions Manual.
Attention
To avoid conflicts, we recommend that you set the permissions for an event group and its underlying events in the same way.
You can change the owner of the event or the event group that has focus.
To change the owner, click “Change Owner” and select a different user from the drop-down menu. If you want to change the owner of all events of an event group at once, you must first expand the events list then choose a new owner for all the events.
Attention
If you change the owner, the permissions for that event might change since they are determined by the owner.
Yesplan displays the permissions for the event’s current status automatically. If the event has the status ‘Confirmed’, for example, you will see a table containing the permissions for the ‘Confirmed’ status. The following actions are available:
- Display the permissions that are applied by default.
- On this event specifically, add permissions for another status using the drop-down menu at the bottom.
You can edit the permissions for the event in different ways:
- You can select or deselect checkboxes from the table for a particular user or group.
- You can add a user or user group and then change the permissions.
- You can remove a user or user group.
Remark
To alter the permissions of an event you must have sufficient permission yourself. It’s thus quite possible that you’ll be able to see but not alter the permissions.
How Custom Data Works§
When assigning and editing custom data on an event or event group, you must take the tree structure of an event into account. Custom data that is entered at the group level automatically appears on all underlying events. This allows you to add custom data to a whole series of events in one go. You can also make exceptions for one or more events afterwards:
- You can enter custom data both on an event group and on separate events. By entering a value for an event group, we ensure that this automatically filters through to (or is inherited by) underlying events.
- You can make exceptions on underlying events by deleting this inherited value and entering a new value.
- You can undo this exception by clicking the arrow that appears next to such exceptions.
- If there is a padlock next to a custom data field at the level of an event group, this means that different values were entered in underlying events.
- You can change the values by clicking the padlock, which deletes all existing values in the underlying events and causes the newly entered value to be inherited by those events.
Please note: if you remove an event from an event group, it loses all the custom data info that it inherited from the event group. If you add an event to the event group, it will automatically inherit all existing custom data from the event group.
Remark
Custom data fields may or may not be applicable to an event. This depends on the status or the profile of the event. These conditions are set by a Yesplan administrator. It’s possible that a certain custom data field disappears if the event changes status or profile. However, this data is kept in the background, and it reappears if the custom data field becomes applicable once again, e.g. by changing the status or profile.
Setting Productions in an Event Group§
In an event group, you can indicate which events belong to the same production. An event or event group can only belong to one production.
All events that are part of the same event group light up together in the calendar when you hover the cursor over one of the events. Regular event groups light up in light blue, productions light up in dark blue.
Below you see an example of the ‘Shakespeare’ event group in the calendar, with two productions ‘Hamlet’ and ‘Othello’, each containing three performances.
You can set the productions within the event group via the popover or via the event inspector. In the popover, you click the pencil icon and then you can select the productions. This works similarly in the event inspector, by clicking the “Set Production” button.
You can also indicate the production in the Tree View.
A Yesplan administrator can determine whether or not new events are indicated as a production by default (see System Preferences).