Event Calendar
The event calendar gives an overview of locations, dates and events. Discover the capabilities and the parts of the calendar below.
Locations§
You can determine the displayed locations and their order yourself. This is a personal setting for each user and doesn’t influence the calendar view of other users.
The following actions are available:
- Show or hide one location.
- Change the order of displayed locations.
- Save displayed locations (including their order) as a set.
- Hide all locations and display a different set.
- Display extra locations, where events are planned, temporarily.
- Display extra locations where events are planned of an event group that is partly visible.
- Hide temporarily displayed locations again.
Yesplan automatically saves displayed locations when you sign out and will display them again the next time you sign in.
Attention
When you open the event calendar, Yesplan will only show the first thirty locations.
Customizing the Way Locations are Displayed§
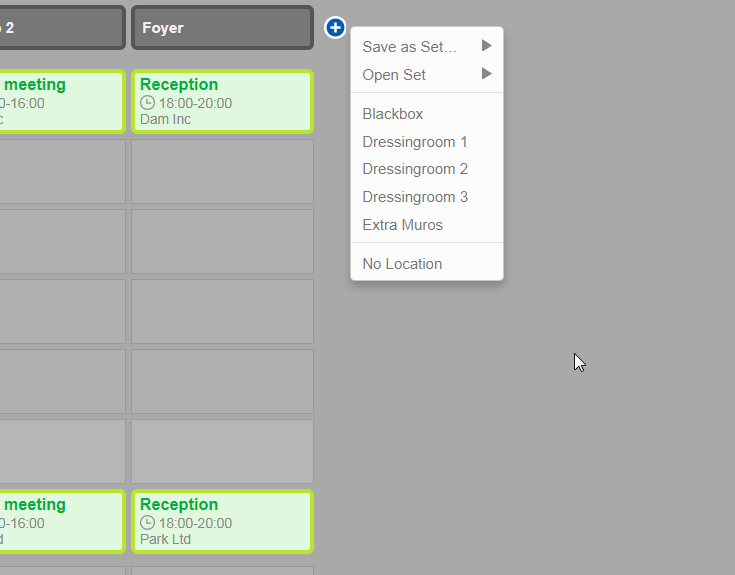
To display a location, click the ‘+’ icon next to the rightmost column. You can select the desired location from the drop-down menu.
To hide a location click the ‘–’ icon in the heading of the column. This appears next to the location name when you hover the cursor over the heading.

Drag the entire column to customize the order of the locations. Do this by grabbing the heading (with the location name).
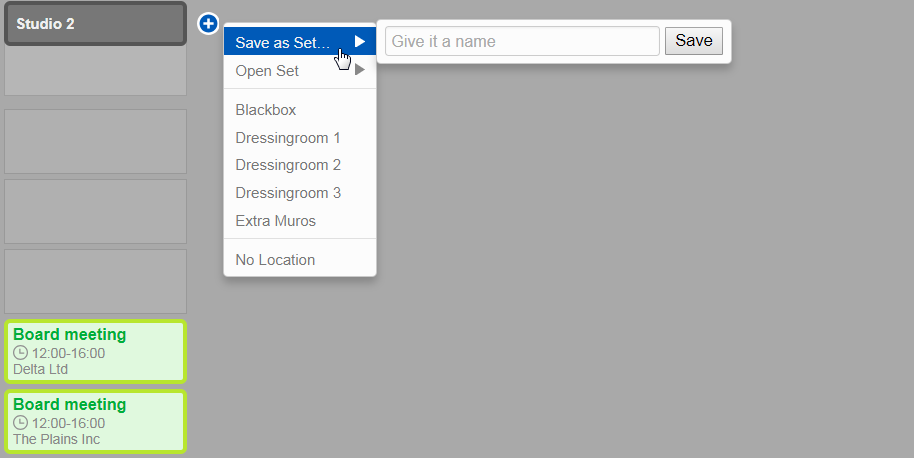
Location Sets§
You can save a series of displayed locations and their order as a set. The saved sets are personal and allow you to quickly switch between frequently consulted locations in your calendar.
You can create a set via the same menu that is used for adding a location to the displayed locations (via the ‘+’ icon next to the rightmost column). Give the set a name to find it again quickly. When you click a saved set in the drop-down menu, the currently displayed locations are hidden. Only the locations in the set will appear.
Your Yesplan administrator can also determine a default location set:
- When new users sign in to Yesplan for the first time, the calendar displays all the locations of the default set owned by their team.
- You can also call up the default set in the calendar via the ‘+’ icon > “Open Set” > “Default Set”.
Tip
- See Managing Locations for more information on the default set.
- When you open the event calendar, Yesplan will only show the first thirty locations. Please take this into account if your location set contains more than thirty locations: you’ll need to call up the set manually after opening the event calendar.
Hidden Locations§
Next to the rightmost location, Yesplan indicates per date whether events are planned in locations that are hidden for the user. By clicking the cell in this extra column, all locations with events will appear. These locations only appear temporarily: they aren’t remembered when you sign out.
Tip
You can hide the temporarily displayed locations by clicking a calendar view icon (large view, medium view or small view).
No Location§
A special “No Location” column can appear in the event calendar, for events without a location. In this column, you can create events without a location. You can also place the column between the other locations.
Dates§
Date Decorations§
Dates can be given a special status in the calendar. Examples include public holidays, school holidays, busy periods, vacation periods etc. You can mark these special dates in Yesplan using date decorations. In the calendar, these dates appear in the left column with a different border color, text color and a description.
Remark
By default, only a Yesplan administrator can edit date decorations. However, in the system preferences they can set up the date decorations in such a way that every user can adjust date decorations in the calendar. Please take into account that date decorations can also indicate in Teamplanner the days when one isn’t expected to work (public holidays etc.). See Contracts in Teamplanner for more information.
You can mark a date with one or more date decorations. In the calendar, you click the name of a previously set date decoration in the dates column or—if no date decorations have been set—you click “Regular day” (which appears when you hover the cursor over the date cell). Next, a list of the available date decorations appears. You determine which date decorations are applicable for the date by selecting or deselecting date decorations. When you change a date decoration, it changes for all users, not just for yourself.
The available date decorations and matching colors are determined by a Yesplan administrator (see Managing Date Decorations). An administrator can also link a date decoration to an iCalendar file (which contains the official public holidays, for example). If date decorations are added in this manner, you can’t deselect them in the calendar for that specific date. But you can still select other decorations for that date.
Working Date§
The calendar opens by default on today’s date. However, you can set the calendar to open on the working date, the last date you were working on in Yesplan.
The working date is set by the following actions:
- If you select an event in the calendar.
- If you navigate to a new date with the date picker.
- If you select a date or a booking in Teamplanner.
This helps you to keep working around the same date on different locations within Yesplan. For example, if you go from the event calendar to the Teamplanner day view, you will notice that this view opens on the working date.
You can find this setting to open the event calendar on the working date under “User Settings”, in the “User Preferences” tab. Under the setting “Always open calendar on” select the option “previous working date” from the drop-down menu. Next, click “Save” below the list to save the changes.

Events§
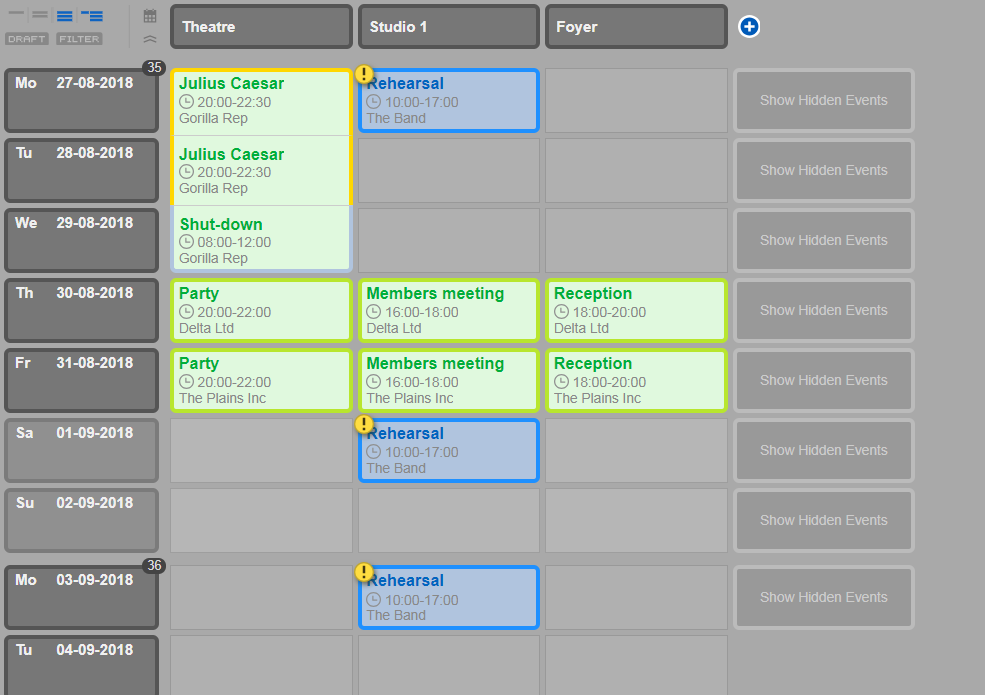
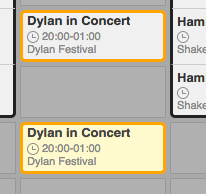
All events appear in a cell in the calendar, with the following information:
- Name
- Status (background color of the cell)
- Profile (border color of the cell)
- Start and end times (if filled out in the schedule)
- Event group to which the event belongs (if applicable, doesn’t appear in the small view, see Calendar views)
- Option order (if the status has type “Option”)
A yellow icon containing a question mark or exclamation mark may appear at the top left of the event:
- Question mark: The event contains booked placeholders which haven’t been swapped yet, see Placeholder booking for more information.
- Exclamation mark: The event contains a conflict, see Conflicts for more information. The exclamation mark also appears when you still have to swap booked placeholders on top of the conflict.
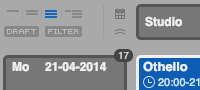
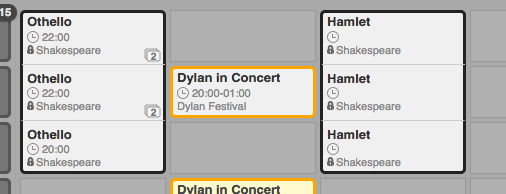
Option Order§
Events that have a status of type “Option” are ordered based on the moment when the event was booked in Yesplan. This order appears in the calendar (the number in the yellow circle near the event), letting you know which option was placed in the calendar first. Options are thus not sorted according to the start time of the show. Moreover, they appear in a separate section under the events on that day that don’t have a status of type “Option”.
In the system preferences, a Yesplan administrator can set the definition of the moment when the event was booked: either the moment when the event appeared in the calendar for the first time or the moment when the event was booked in the location. You’ll learn more about this in the System Settings Manual, under sorting order of event with the status type “Option”.
Locked Events§
Locked events are events whose date, location and name you can’t just alter, and that you can’t just delete. An event is locked if its status is of type “Locked”. You typically want to use this for events that are confirmed.
Users who have been given permission to unlock events can edit the name, location or date of these events by clicking the padlock. These users can also delete the event after unlocking it, if they were given permission to do so.
Locked events appear with a gray padlock. This lock will appear in the calendar when you hover the cursor over the event in question. The lock also appears in the event inspector next to the name, date and location. These padlocks also appear in the tree views of event groups.
Event groups that contain one or more events with the status “Locked” are also protected. You can’t change the name of such a group (unless you unlock the padlock). If a group contains one or more locked events, you can’t delete it entirely, either. However, you can just move or delete events within this group that aren’t locked.
Remark
If an event is locked because actual times were already added to one or more resource bookings, then its name, date and location and its deletion are also protected. You can only unlock such events by deleting the actual times again.
The name of an event group that contains locked events due to actual times will also be protected. But you can open the padlock of the event group if you have the correct permissions.
Unavailability§
Locations appear as unavailable in the calendar by means of red cells. The unavailability of locations works the same way as the unavailability of resources (see the Resources Manual). Moreover, you can add a description in the calendar (e.g. the reason why the location isn’t available that day).
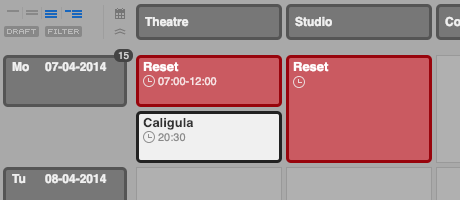
Clicking the clock symbol of an unavailability opens the schedule popover. There, you can set the hours of unavailability (see the Resources Manual).
Event Popover§
In the event popover you see a number of basic properties: name, date, location, status, profile and labels. You can also adjust these basic properties in the popover if you have the correct permissions. Please note: you can’t just edit the name, date and location if the event is locked. These fields are protected with a padlock that you must unlock first (and for which you need the correct permissions).
The popover appears when you hover the cursor over the info icon (the “i”) in the upper-right corner of the event cell in the calendar. The popover disappears automatically when the cursor is removed from the info icon or from the popover itself. When you drag the popover, it will be displayed until you close it yourself.
If the event is part of a production, the popover will also display the name, status and profile of the production. The text “n/a” (not applicable) is written under the status or profile of the production if not all events in the production have the same status or the same profile. Changing the profile or status of the production here results in the profile and status of all the events in this production being changed.
If the event is part of an event group, you will also see the event structure (in the form of a tree structure).
Event Schedule§
You call up the schedule of an event by clicking the clock icon in the event cell in the calendar (this opens a popover). You can also view the schedule on the “Schedules” tab of the event inspector.
If you open the schedule in the calendar, a schedule popover opens. It behaves exactly like the event popover. It will close on its own if you move the cursor away from the window, but if you drag the window or change the schedules then the window will remain open until you close it yourself.
Certain schedule items in the schedule can be separate elements (e.g. ‘Doors’ at 20:00). However, they can also indicate the start and the end of the same sub-activity (e.g. ‘Soundcheck’ from 16:00 to 18:00). Schedule items that are given both a start time and an end time are linked together and appear in the schedule with “(start)” and “(stop)” next to their description (e.g. ‘16:00 Soundcheck (start)’ and ‘18:00 Soundcheck (stop)’).
Linked Times§
You can enter hours in the schedule as an absolute time (e.g. doors open at 20:30), but you can also define them in relation to each other (e.g. doors open half an hour before the performance). You can define the end time in relation to the start time by entering the duration (e.g. the show starts at 21:00 and lasts 45 minutes).
The examples below will clarify the difference between schedules with absolute times and schedules with linked times.
Example of a schedule with absolute times:
- 20:30: Doors
- 21:00–21:45: Concert part 1
- 21:45–22:00: Break
- 22:00–22:45: Concert part 2
- 23:00–00:30: Get-out
If ‘Concert part 1’ will start half an hour later (at 21:30) then you will have to edit all the times in the schedule above to suit the new situation. To prevent this, we can define the same schedule in function of the relations between the times:
- Half an hour before ‘Concert part 1’: Doors
- 21:00: Concert part 1, lasts 45 minutes
- Directly after ‘Concert part 1’: Break, lasts 15 minutes
- Directly after ‘Break’: Concert part 2, lasts 45 minutes
- 15 minutes after ‘Concert part 2’: Get-out, lasts 1:30 hours
If we change the start time of ‘Concert part 1’ to 21:30 in this schedule, then all linked schedule items will change along automatically.
Remark
In the schedule, the times always appear as absolute times, even if they were entered as a duration, or are dependent on another time. When altering (or inspecting) the times, the defined relations appear again and you can edit them.
Adding and Editing Schedule Items§
You add a schedule item by clicking “Add Schedule Item”. You can edit an existing schedule item by clicking “Edit” (this appears when you hover the cursor over the row of the schedule item), by double-clicking the time, or by double-clicking the description of the schedule item. A form opens where you can enter and edit the required information.
Tip
- Read more about how to enter times quickly and easily.
- You must click the “OK” button or press Enter to save your changes.
The form contains the following fields:
-
Date Picker: Select the date for the start time.
The schedule isn’t limited to the day of the event only. You can also add times on the day before and day after the event. You edit the date by clicking the arrows left or right of the date.
Remark
The event will only appear in the calendar on its original date. If the event’s time schedule contains schedule items that take place on another date, then this event won’t appear in the calendar on those other dates. However, a conflict will appear if the event exceeds the shifted day line.
-
Start: Determine the start time of the schedule item.
You can enter an absolute time (e.g. ‘20:00’) or you can define a link with a different schedule item from the schedule. If the linked schedule item changes, this schedule item will shift, too.
In most cases you will enter (absolute) times on the event date. You can also add times on the day before and the day after the event. You do this using the date picker, which is above the “Start” field.
Remark
Yesplan assumes by default that you enter times that take place on the event date. Please note: the shifted day line is taken into account. In other words, Yesplan will interpret the times between midnight and the shifted day line as joined to the event date. Benefit: when you enter such times you don’t have to alter the date first. Yesplan will do this for you automatically.
For example, an event takes place on 14 February from 20:00 to 22:00. If I want to add a time after midnight to the schedule, for example at 01:00, I only have to enter ‘01:00’ under “Start”. Yesplan will interpret this as one o’clock during the night of 14 to 15 February (which is actually 15 February at 01:00). I don’t have to alter the date first.
To clarify that you’re entering a schedule item on the next date, the date (in the date picker above the “Start” field) will automatically change to 15 February.
Yesplan will also interpret the desired date as the event date if you change the schedule item to one hour before midnight. In the example above, if you change the time from ‘01:00’ to ‘22:00’, the date will also change automatically, to the date of the event: 14 February.
Conversely, if you want to add a schedule item at 22:00 on 15 February, you must first select the next date manually in the date picker above the “Start” field (by clicking the arrow to the right of the displayed date). Similarly, if you want to add a schedule item at 01:00 on 14 February, you must select the previous date manually in the date picker (by clicking the arrow to the left of the displayed date).
Once you’ve altered the date manually in the date picker above the “Start” field (by clicking one of the arrows), Yesplan will no longer alter the date for you automatically when you enter a start time.
If desired, you can deactivate the automatic altering of dates for times between midnight and the shifted day line. In “User Settings”, go to the “User Preferences” tab and change the setting “Use shifted day time in event schedule editor input fields” to “No”.
You create a link with a different schedule item by clicking the arrow next to the input field. In the drop-down menu that appears, you then select the desired schedule item. This drop-down menu will only be available if a different schedule item already exists in the schedule. If you create a link with a different schedule item, you can also add a certain time (e.g. ‘get-out starts 15 minutes after the concert’).
The action “Show Links” appears if another schedule item links to this start time. Clicking this opens a list of all schedule items that are linked to this start time.
-
Add Offset Time: This only appears under linked start times. Set an offset time in relation to the other schedule item.
If you create a link with another schedule item, you can also add a certain time. For example, ‘get-out starts 15 minutes after the concert’ or ‘doors open one hour before the show starts’. The offset time will determine how much earlier or later this schedule item will start compared to the linked schedule item.
For example, to indicate that get-out will start 15 minutes after the end of the concert, select the schedule item you want to link to from the drop-down menu (‘Concert (stop)’). Then click “Add Offset Time” and enter the desired offset time (
+0:15).To indicate that the doors will open one hour before the show starts, select the schedule item you want to link to from the drop-down menu (‘Show (start)’). Then click “Add Offset Time” and enter the desired (negative) offset time (
-01:00).The offset time is limited to 24 hours before or after the linked schedule item.
You can delete offset times by clicking “Delete Offset”.
-
End: Determine the end time of the schedule item.
An end time is optional, you aren’t required to enter a value.
An end time can be an absolute time (e.g. ‘22:00’) or you can express it in relation to the start time by indicating the duration (e.g. ‘get-out starts at 22:00 and lasts two and a half hours’, written as ‘2:30’). Such end times will shift if the start time changes.
The action “Show Links” appears if another schedule item links to this end time. Clicking this opens a list of all schedule items that are linked to end time.
Remark
- The input field is set by default to the input of absolute times. You will see a clock icon next to the input field and an indication with a small button switched up. By clicking the clock, you can change the input field into a duration input field. This is indicated by an alarm clock icon and a small button switched down. By clicking the alarm clock, you can change the input field back to an input field for absolute times.
- You can switch between the positions as often as necessary. If a value has been entered in the field, the end time will automatically change from absolute time to the correct duration, or vice versa. For example, to indicate that the get-out lasts two and a half hours, you click the clock icon and enter the desired duration, ‘2:30’.
- Read more about how to enter relative times quickly and easily.
The end time must take place after the start time. The duration is limited to 24 hours, and the absolute time can be maximum 24 hours after the start time.
If you’ve chosen a linked start time, it isn’t possible to enter an absolute end time. In such cases, you still have to input the duration under the end time.
You can delete an end time by clicking “Delete End Time”.
-
Description: Give the schedule item a description.
You can enter schedule descriptions freely, or they can be determined by a Yesplan administrator (see Labels and Descriptions). Existing descriptions that match the typed letters appear in the suggestion list.
-
Delete: Delete the entire schedule item.
Click the “Delete” button to delete the entire schedule item from the schedule. You can also delete individual times. Some schedule items can’t be deleted (see Deleting Schedule Items).
Determining the Displayed Start Times and End Times§
You can indicate the displayed start and end times (typically the audience hours) of the event in the schedule. They will then appear in the event calendar. You can indicate these times by clicking the left or right bullet next to the desired time in the schedule (to the right of the row), making it turn red. A red bullet in the first column refers to the start time, a red bullet in the second column refers to the end time.
Start Times and End Times§
For each event, Yesplan also determines the start and end times, which are used for Resource Bookings, for example. These calculated start and end times are not the same as the displayed start and end times: these two concepts aren’t related.
Below, we describe how Yesplan calculates start and end times. Let us assume that an event takes place on 7 April, with a shifted day line at 07:00:
- If the schedule doesn’t contain any schedule items:
- The start time of the event is the shifted day line on the date of the event: 07:00 on 7 April.
- The end time of the event is the shifted day line one day after the date of the event: 07:00 on 8 April.
- If the schedule contains multiple schedule items:
- The start time of the event is the start time of the first schedule item.
- The end time of the event is the end time of the last schedule item. If that schedule item doesn’t contain an end time, Yesplan will use the start time of the last schedule item.
- If the schedule contains just one schedule item with a start time and end time:
- The start time of the event is the start time of that schedule item.
- The end time of the event is the end time of that schedule item.
- If the schedule contains only one schedule item with just a start time:
- The start time of the event is the start time of that schedule item.
- The end time of the event is the shifted day line one day after the date of the event: 07:00 on 8 April.
- If the schedule contains only one schedule item with just a start time, and the schedule item falls after the shifted day line one day after the date of the event (07:00 on 8 April):
- The start time of the event is the shifted day line one day after the date of the event (07:00 on 8 April).
- The end time for the event is the start time of that schedule item.
Attention
We strongly advise against applying the latter scenario in practice, because it’s very confusing:
- The start time of the schedule item is automatically the start time shown for the event.
- The start time of the schedule item is at the same time the (calculated) end time for the event.
Deleting Schedule Items§
You can delete schedule items in two ways:
- Hover over a schedule item, click “Edit” and then “Delete”. Then delete the entire schedule item, including the start and end times.
- Hover over a schedule item’s start or end time and click the ‘–’ icon on its right. In this case you delete the start or end time only.
Remark
It isn’t always possible to delete schedule items. In such cases, a padlock will appear after you click “Edit”, displaying the text “Why is This Locked?”. Click it for more information.
-
Has a schedule item been used in a booking? Then it will be locked and a gray padlock will appear. You won’t be able to delete the schedule item, but you will be able to alter the times and the description. Would you like to delete it completely anyway? Then alter the booking first.
If, for example, Violet is booked for the schedule item ‘Soundcheck’ from 17:30 to 18:30, then you won’t be able to delete the schedule item ‘Soundcheck’, but you will be able to change it to ‘Get-in’ from 17:00 to 18:00.
-
Has a schedule item been used in a booking and does the booking contain actual times? Then it will be locked and a blue padlock will appear. You won’t be able to delete the schedule item, or to adjust the time, but you will be able to change the description.
If, for example, Violet is booked for the schedule item ‘Soundcheck’ from 17:30 to 18:30, and actual times have been entered for that booking, it will only be possible to change the description to ‘Get-in’.
You can delete a schedule item that is being linked to, but then the schedule item that links to it will be converted to an absolute time automatically, and the schedule may lose its coherence as a result. For that reason, Yesplan asks for confirmation when you try to delete a schedule item that another schedule item in the schedule has been linked to.
For example, see the linked schedule:
- 14:00: Start
- 16:00: End
- Half an hour after ‘End’: Cleanup
If you delete the schedule item ‘End’, then the schedule item ‘Cleanup’ will be converted to an absolute time:
- 14:00: Start
- 16:30: Cleanup
Calendar Views§
You see all the events per date and per location in the default view. By choosing the collapsed view in the upper left corner of the calendar, only one event appears per cell, and the others are hidden under this event. You can choose which event is displayed by:
- Clicking the stack icon in the lower right corner of the event: the red bullet indicates which event appears on top.
- Clicking the bullet of the desired event.

In the upper left corner of the calendar, you can also choose between a small, medium or large view of events. In the small view, the name of the event group doesn’t appear.
Filters§
With the filter, you can limit the displayed events in your calendar based on status, profile or label, and you can choose to hide unavailabilities. When a calendar is filtered, the filter icon in the upper-left corner turns red.
To set a filter, you click the filter icon and then “Add a Filter”. Select the desired option from the drop-down menu. You can add an extra option to the filter by clicking “Add a Filter” once again. When you’re satisfied with the options, click “Apply Change”. Now only events that have the chosen status, profile or label appear.
To turn the filter off, you click the filter icon: the calendar will display all the events once again.
Filter settings are remembered, even when you sign out. You can activate the last used filter by clicking the filter icon once again. If you change the options, then this becomes the new saved filter.

Navigating through the Calendar§
There are various ways to navigate to another date:
- Use the date picker (upper-left) to re-open the calendar on a specific date.
- Click the navigation arrows (above or below the date column) to display a few additional weeks before or after the currently displayed weeks.
- Scroll far enough down to display the next few weeks in your calendar. If there is no scrollbar you can click the double arrow under the date column.
- Event groups in which not all events are displayed have blue tabs when you hover the cursor over the cell. The number in these tabs indicates how many events of that event group occur before or after that date. If you click a tab, the event calendar will navigate to the next event in that event group.
Conflicts§
Yesplan doesn’t prevent you from overbooking a location, and you can assign more than the available resources to an event. However, Yesplan will mention this via an event conflict. An event with a conflict is an event of which the planning probably isn’t correct, according to the information that Yesplan has. A conflict also mentions the required information why there is a planning problem.
You can choose to ignore and mute a conflict (by clicking “Mute” next to the conflict in question).
Via the navigation bar at the bottom of the screen, you can open a window with a list of all conflicts for events in the future by clicking “Conflicts”. In this window, you can also view all muted conflicts (by clicking the “Show Muted Conflicts” button) and, should you want to, you can choose to show a muted conflict again (by clicking the bullet to the right of the conflict row).