Yesplan 1.22, Jun 2017
Sharing Reports§
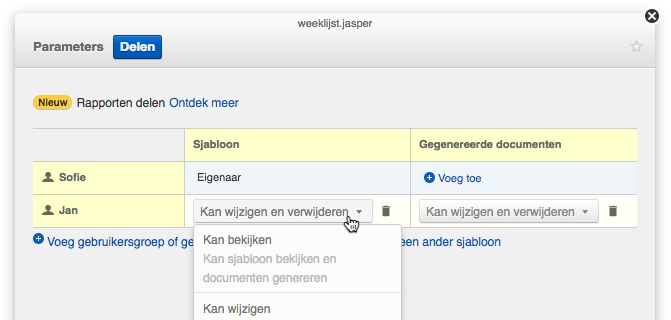
The way that you determine report permissions has changed. From now on, you share reports directly with one or several users. The owner of a report determines with whom the report is shared, and what those users can do with it (view, edit or delete the report).

Report permissions are no longer set and distributed in the same way as for events, resources, prices, contacts and tasks. Managing report permissions has been removed from the system settings. From now on they will now be managed by the owner of the report, under the reports themselves.
You can share reports with users, but also with user groups (also new!). Users will always inherit permissions from the user group they belong to.
For example: if Jan receives permission to view but he also belongs to the ‘Technicians’ user group, which can edit and delete, then Jan will be able to edit and delete the file. He acquires those permissions via the user groups that he belongs to.
You set up report sharing via the templates inspector or the generated documents inspector. In the report templates inspector, the owner can determine with whom the template is shared and with whom the generated document will be shared initially. By default, the generated document is shared with users (as set up in the template inspector), but the owner of the generated report can edit the default permissions and share the document with additional users. Please note: the user who generates the document will be the owner of that specifically generated document.
An administrator has the same options as an owner.
You can read all about it in the reports manual.
Tip
The permissions system that you use for all other Yesplan elements was also used for report templates and generated documents before this version of Yesplan. When switching to this version, the permissions for report templates were switched to the new system of sharing but the permissions for existing generated documents were retained in accordance with the previous system.
You can decide, per generated document, whether to switch to the new system of sharing (e.g. after verifying that this doesn’t have any adverse consequences). You can do this in one go for all old generated documents via the report template inspector.
You can read how to do this in the reports manual under the chapter Documents that were generated before the introduction of sharing
Teams for Human Resources, User Groups for Permissions§
Teams and permissions have been separated: it wasn’t a good marriage and—in the end—the new situation is better for both parties.
In the past we attempted to summarize the organization’s complex structure in one definition whereby users were classified in function of their permissions and human resources were classified in function of their grouping into teams.
After this update, teams and permissions are separate concepts: human resources will be grouped in teams, permissions will be distributed to user groups.
From now on, teams are only a set of human resources. You can use teams in the Teamplanner to quickly call up a group of human resources and when assigning tasks.
The newly introduced user groups are sets of Yesplan users. From now on, user groups only serve to distribute permissions to a group of users.
So from now on, teams are completely separate from users, user groups and Yesplan’s permissions system.
When switching to this version, an exact copy of the old teams was made both for teams (for human resources) and for user groups (for permissions). In practice, nothing changes with regard to permissions and the composition of teams.
By dividing into teams for human resources and user groups for permissions, you can put your house in order at your own pace. You can delete items from the list of teams that used to be used for permissions (for example to have the drop-down menus for choosing the right team only contain those teams that are useful in the context of human resources). Similarly, you can delete items from the list of user groups that used to be used for grouping human resources (and perhaps sometimes led to permissions being set incorrectly).
Diverse Improvements§
General§
-
From now on, you can use the browser’s zoom functionality to make the text smaller or larger without making a mess of the event calendar.
-
You can alter the unavailability times quickly in the event calendar by clicking the clock icon and using the popover that opens (just like we do when altering the times of an event).
-
You can choose to remember your details when signing in so that you sign back in automatically the next time you open Yesplan (within a certain time and as long as you haven’t explicitly signed out, and if this option hasn’t been switched off by an administrator).
-
You can also use your email address to sign in (instead of your username). Please note that this isn’t possible if the same email address is used multiple times and therefore isn’t uniquely linked to one user. In such cases you can only sign in using your username.
-
When using date navigation in the week view of the Teamplanner to go to the previous or the next day, the dates that appear on the screen are expanded automatically if you navigate past the period that was already shown on the screen.

-
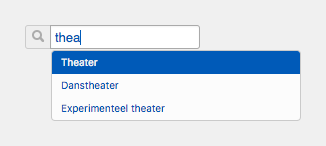
From now on, Yesplan searches through the entire text in all suggestion lists rather than only in the beginning of the text (that wasn’t the case in the past when searching for labels or schedule descriptions, but it was for other suggestion lists). The results that start with characters that correspond with the query still appear first.

-
In the past you could share your own session with others for a very short time by sharing the URL. This is no longer possible for security reasons.
Administration§
- You can completely switch off the search box filter (previously: “My Team / All Teams”, from now on: “My User Group Only / All User Groups”) in the system preferences. The user will always see all results that they have permission to see.
- All unnecessary values in the “Client” attribute were deleted from the API keys. In practice, you only need to change this attribute for integrations with ticketmatic v2. In all other cases, you leave the value at “None”.