Using Reports
Below we describe how you can use reports in Yesplan.
Reports consist of two parts, namely:
- Templates: These files with the extension
.jasperor.zipcontain all information about the structure and the lay-out of the report. - Generated Documents: These files show the desired information after filling out parameters, in the layout defined by a template. A report is mostly in the formats PDF or XLSX.
We distinguish between two types of reports:
- General reports collect every kind of information possible from Yesplan, usually within an adjustable period. You can find these reports in the reports finder, which is opened by hovering over the “Reports” tab in the navigation menu and clicking “Reports”.
- Reports for events show information that is specific to the event, the production or the event group. You can find them on the “Reports” tab of the event inspector.
Yesplan provides a catalog of General Templates and Event Templates. It covers all information, specifications, possible parameters etc. in these default reports.
If your organization needs customized reports, please contact your Customer Success Manager.
Online Learning
Are you a new Yesplan user? Be sure to check out our Online Learning Platform (NL/EN).
- Follow the training sessions on reports.
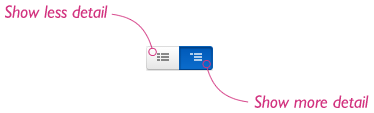
Tip – Show More Detail§
The list of report templates and generated documents appear as compactly as possible by default. You can see more details of each file by clicking the list icon at the top of the list.
Adding Report Templates§
Report templates contain all information on the structure and layout of the report. Templates can be in one of two formats:
- A file with the extension
.jasper. These templates only support one language. - A file with the extension
.zip. These templates support multiple languages. General Templates and Event Templates have this format.
In addition, a distinction is made between general templates and specific event templates:
- General templates are added in the reports finder, that you can open via “Reports” > “Reports” in the navigation menu.
- Events templates are added in the event inspector, in the tab “Reports”. You can add these templates to any event and it will be immediately available for all events.
There are two ways to add a report template:
- Choose a template from a list in Yesplan:
- Open a window for reports: the reports finder or the “Reports” tab in the event inspector.
- Click “Add Template…” at the top.
- “Choose from List” is usually selected by default.
- In the menu, choose the content you wish to generate with the templates: “Events”, “Teamplanner”, “Tasks” or “Teams”.
- Then select a template in the list.
- Click “Add”.
- Upload a template. This can be a template you’ve received from us, or one that you’ve downloaded yourself from Yesplan:
- Open a window for reports: the reports finder or the “Reports” tab in the event inspector.
- Click “Add Template…” at the top.
- Choose “Upload” as the way to add the template.
- Choose the template on your computer.
- Click “Add”.
Tip
- If you add an event template, you can select a template directly from the list without first selecting on content.
- When uploading, you can simply drag the file to the button “Choose file…” from Finder on macOS or from Windows Explorer.
- In the detail display (see Tip – Show More Detail) you can also see beside the name of the template who has uploaded this template and when.
When you add a template, you can complete two additional fields:
- Description: This field is optional. Here you can enter more information about the report template.
- Everyone can view: If you select this checkbox, then every user in the highest user group of your installation can view this template. See Sharing Reports for more information.
Generating Documents§
The information in a generated document is a snapshot of the information that is present in Yesplan at the moment it has been generated. The file has the extension .pdf or .xlsx.
If you see the “Generate” button next to the name of a report template, then you can generate the report immediately without requiring you to enter extra information. Click the button and the generated document will appear in the column on the right.
If you see the “Generate…” button next to the name of a report template, then you must enter some extra parameters (such as start date and end date) before you can generate the document. Click this button, enter the required parameters then click the (blue) “Generate” button under the list of parameters. The document will also appear in the column on the right.
To see all documents that were generated based on a certain template, click the “Show Generated” button (in the left column).
In the list of generated documents (right column) you see the name of the user who generated the report and when it was generated. Under the details view (see Tip: Show More Detail) you can delete the document, add a description or determine with whom you share the document. You can also find a link to the generated document (“Copy Link”), for example to share the link with others, and you can determine whether the file is accessible externally or not.
Attention
By default, attachments and other files saved in Yesplan can only be accessed by people who have a Yesplan user profile. However, you can also make files accessible externally. In that case, everyone who has a link to the file can open the file without signing in to Yesplan first.
Deleting General Reports Automatically§
General reports—reports that you generate in the reports finder—are automatically deleted after six months. To be clear: this is not the case for reports that you generate in the event inspector.
If you want to retain a certain report for an indefinite period, you can indicate this per generated document. You do this by clicking “Do Not Delete It Automatically”.
Of course you can delete a generated document manually at any moment.
By deleting a generated document you only delete the snapshot. Based on the report template, you can generate a document again to obtain an updated version. Deleting a report template is always final.
Setting Report Parameters§
What Do Parameters Do?§
A report template is a file that contains the structure and layout of the report. When generating the document, this template is filled with the data that is present in Yesplan at that moment.
You don’t usually want to see all data in Yesplan on a report, but only some of the data. Using parameters, you determine which data appear on the generated document, and which properties they must satisfy.
Supposing you want a summary of all confirmed concerts within a specific period:
- In the parameter field “Profile”, you enter ‘Concert’.
- In the parameter field “Status”, you enter ‘Confirmed’.
- In the parameter fields “Start Date” and “End Date”, you enter the desired period.
When generating the document, the properties you’ve entered will now be taken into account. Only events that satisfy these parameters appear in the generated document.
Tip
- The manual provides a summary of the available parameters for each report individually. See General Templates and Event Templates for more information.
- Depending on the report template, you can select one or multiple values for a parameter. If you can select multiple values, you can also change the order of the values by dragging them to another position.
Settings for Parameters§
You determine parameters in the report template. The parameters are given a default label via this template. Each parameter has a comment field. You can change the label of a parameter and—if desired—add a comment.
To manage the parameters, expand the list of report templates first so that you see more details of each report template (see Tip: Show More Detail). Then click “Inspect” under the report template to open the inspector.
On the “Parameters” tab you’ll see the list of parameters for that template. If you have permission to, you can edit the values.
The name of the parameter and the description can be edited by double-clicking it or by clicking the pencil icon that appears when you hover the cursor over the name. If you empty the name of the parameter, then the default name will be used. If you empty the description, then no description will appear next to the parameter.
There is also an eye icon next to every parameter. The eye offers two possibilities (by clicking it you switch between them):
- Visible: This is indicated by an open eye. Users will see these parameter fields when generating documents. If you enter a value in the input field then that will be the default value for the parameter. Required fields (which have a red star) can only be hidden if they’ve been given a default value.
- Invisible: This is indicated by a crossed-out eye. The default value that you entered is used as a permanent value when generating the document and remains hidden from users. This functionality is handy for protecting the multitude of parameters from users in order to prevent accidental changes.
Making parameters invisible prevents users from filling out these parameters after clicking “Generate…” next to the template. When sharing the report template, you must set the permissions to the desired level if you want to prevent users from adapting the parameters in the report template inspector (by clicking “Inspect” in the list). See Sharing Reports for more details about limiting the possibilities of certain users.
Advanced Parameters§
Some parameters are not only used for selecting data, but also allow you to change the way in which the report is displayed or carry out an advanced query. You will find a summary below.
Title§
With this parameter, you can edit the title in the header of the generated document. Please take into account the amount of space allotted for the title. You should test this before closing this parameter for users.
Logo§
This parameter field is a text field where you enter the URL (the internet address of the file) of the desired logo. Logos from your own organization are often found in Yesplan as an attachment of your organization, under Contacts. Follow these steps to add such a logo to your report:
- In the navigation menu, go to “Contacts” and search for your own organization.
- Open the organization inspector and go to the “Attachments” tab.
- Search for the desired logo and click its title (in blue).
- The logo will open in a new tab. Copy the URL of the logo from your browser’s address bar.
- Navigate to the desired report and paste the URL in the “Logo” parameter field.
Make sure that the resolution of your logo is high enough. Test this and, if required, upload a different logo or place a high-resolution logo on your own web server.
Query§
This parameter allows you to compose your own query.
For example, the query contact:label:volunteer + contact:label:VIP will result in all contacts with the label ‘volunteer’ and all contacts with the label ‘VIP’.
You can also test a query as a report parameter. To do this, click the “Test” button. This opens the finder, which allows you to check the results interactively. If you adjust the query in the finder then this query will be copied in the parameter field when closing the finder.
You can find more info in the query language manual).
Dataview§
It’s possible to create a customized dataview and add it as a parameter to the report. Yesplan will then use the information in the dataview to generate the report.
Attention
- Since the dataview is customized, the report will only work if the dataview has the correct structure in terms of columns and parameters.
- For this reason, Yesplan will automatically lock a dataview when you use it as a parameter in a report. See Locking Dataviews for more information.
Language and Region§
The language and region of a report determine how specific parts of the report, such as numbers, the date, time etc. appear.
For example:
- “nl-NL”: Maandag 15 April 2013
- “fr-BE”: Lundi 15 Avril 2013
If the report in question supports it, you can choose the language and region in two ways, depending on the extension of the template:
.jasper: Use the parameter “YP_LOCALE_STRING”..zip: Use the parameter “Report language”.
Remark
- The parameter “YP_LOCALE_STRING” won’t appear if the
.jaspertemplate only supports one language. - For
.ziptemplates, the “Report language” parameter always appears, even if only one language is supported.
Some common codes:
| Code | Language (Country) |
|---|---|
| da-DK | Danish (Denmark) |
| de-DE | German (Germany) |
| en-GB | English (UK) |
| fr-BE | French (Belgium) |
| nb-NO | Noors Bokmål (Norway) |
| nl-NL | Dutch (Netherlands) |
Contact support if you need a different language setting.
Prefix§
Organizations that work with different sub-organizations can give their locations a prefix, for example ‘PIA_Auditorium’. To indicate that you only want to see ‘Auditorium’ in the report, enter ‘PIA_’ for this parameter field. Now only ‘Auditorium’ will appear on the report.
Sharing Reports§
You can share reports with other users, and when sharing reports you determine what other users can do with the report (view, edit or delete).
This differs from applying permissions for events, resources, prices, contacts and tasks. For these elements, permissions are mainly set under system settings, and that for every element with a certain owner. The reports are shared in the reports section itself, and not in a permission template.
The owner of a report template can share his/her template with other users. This always occurs directly via the template. The owner also decides what users can do with it.
For generated documents, this is set via the report template (by the owner of the template), but this can be adapted per generated document (by the owner of the generated document).
An administrator has the same options as the owner.
Sharing Report Templates§
How and with whom you share a report template is established in the report template inspector. You can open this by clicking “Inspect” in the list with templates, under the details view (see Tip: Show More Detail). On the “Sharing” tab you’ll see a list of users or user groups.
In the left column you’ll see with whom the template is shared and what users can do with it: view, edit or delete. In the column on the right you’ll see how the generated documents will be shared initially (the owner of the generated document can change this, see Sharing generated documents).
When sharing, the owner can adjust the options (that allow viewing, editing or deleting), can delete a user or user group from the list (via the icon with a trash bin in both columns), or can share files with additional user groups or users (by clicking “Add User Group or User” at the bottom of the table).
When sharing, the options are:
- Can View: Allows someone to see the template and to generate reports with this template.
- Can Edit: Allows someone to view the template and edit the name and description, to replace the template, and to hide, show or set default values for parameters.
- Can Edit and Delete: Allows someone to edit and delete the template.
The owner (or an administrator) can choose to make a different user the owner of the report template by selecting “Make Owner” in the drop-down menu. In addition to edit and delete, the owner can also determine with whom the file is shared and what users can do with it.
Attention
You can share reports with users, but also with user groups. Users will always inherit permissions from the user group they belong to.
For example, in the table, Jan has permission to view. However, Jan also belongs to the ‘Technicians’ user group and that group can edit and delete. As a result, Jan will be able to edit and delete the file since he acquires those permissions via the user group he belongs to. This will be indicated in the table via a warning.
This way of combining permissions deviates from the permissions system for other Yesplan elements.
Tip
At the bottom of the table you can use the settings from a different report template via the action “Duplicate Permissions of Another Template”. You choose a different report template and the entire list will be replaced by a copy from the list of the chosen template. Please note: the owner of the template isn’t overridden. The user who was the owner in the duplicated template, will appear in the left column with the option “Can Edit and Delete”.
Sharing Generated Documents§
How and with whom you share a generated document is established in the generated document inspector. You can open this by clicking “Inspect” in the list with generated documents, under the details view (see Tip: Show More Detail). On the “Sharing” tab you’ll see a list of users or user groups. Please note, the generated document will be shared with the users that are defined in the inspector of the template. However, the owner of the generated document is allowed to edit the default permissions and to share the document with additional users.
The user who generates the document will become the owner of that document. This can differ from the owner of the report template upon which the document is based.
In the list, rows that are copied from the report template are marked with a padlock. If the settings for the relevant generated document were edited, then the row is marked with an open padlock. The owner of the generated document can add additional user groups or users to the list. These aren’t marked with a padlock.
A row that is copied from the report template can be overridden via the action “Override”. You can undo this via the action “Revert to” (this only appears after overriding).
When sharing, the options are:
- Can View: Allows someone to view and download the generated document.
- Can Edit: Allows someone to view and to edit the name and description of the generated document.
- Can Edit and Delete: Allows someone to edit and delete the generated document.
The owner (or an administrator) can choose to make a different user the owner of the generated document by selecting “Make Owner” in the drop-down menu. In addition to edit and delete, the owner can also determine with whom the file is shared and what users can do with it.
Tip
You can share reports with users, but also with user groups. Users will always inherit permissions from the user group they belong to.
For example, in the table, Jan has permission to view. However, Jan also belongs to the ‘Technicians’ user group and that group can edit and delete. As a result, Jan will be able to edit and delete the file since he acquires those permissions via the user group he belongs to. This will be indicated in the table via a warning.
This way of combining permissions deviates from the permissions system for other Yesplan elements.
In the row for the user group, a warning appears that indicates through which user group the user receives more extensive permissions.
Documents that Were Generated Before the Introduction of Sharing§
The permissions system that is used for all other Yesplan elements was also used for report templates and generated documents before version 1.22 of Yesplan. When switching to version 1.22, the permissions for report templates were switched to the new system of sharing, but the permissions for already existing generated documents were retained (in accordance with the previous system).
You can’t edit these retained permissions for the generated documents. You can decide, per generated document, whether to switch to the new system of sharing (e.g. after verifying that this doesn’t have any adverse consequences), afterwards editing becomes possible once again.
You do this on the “Sharing” tab of the generated document inspector. You open this inspector by clicking “Inspect” in the list with generated documents, under the details view (see Tip: Show More Detail). Click “Show how the document would be shared” (the settings will be equated with the right column of the report template), evaluate the results then click “Switch to sharing” to complete the task.
You can do this in one go for all old generated documents of the same template.
You do this on the “Sharing” tab of the report template inspector. You open this inspector by clicking “Inspect” in the list with templates, under the details view (see Tip: Show More Detail). If there are documents that still use retained permissions, then a warning will appear at the bottom of the table. Click “Switch to sharing for all” to apply the settings as they appear in the right column of the table to all the old documents.
Take into account that you can’t undo the switch to sharing for those generated documents.