Webhooks API
Yesplan offers customers and third parties the possibility to integrate with the system using webhooks. The integration allows a user to take an action in another system from within Yesplan. Yesplan sends the action to the other system. The other system can then retrieve, and write, data through the Yesplan HTTP API. A wide range of workflows that use Yesplan and other systems can be implemented using webhooks and the HTTP API, such as announcing a Yesplan event on a public website, making tickets for it available in a ticketing system, invoicing the event in financial software and so on. Webhooks allow all of these workflows to be initiated from within Yesplan while being handled by the other system.

Users take actions in the other system from within Yesplan through a custom data field. The field shows a current state and buttons for the various actions the user can take. Both the current state and the possible actions are defined by the other system. On the above screenshot, the current state is “Published”, which might, for example, be a state as given by a system that publishes Yesplan events on a public website. The actions the user can take are to “Update” the event on the website, or to “Revoke” it from the website.
Summary§
Webhooks are implemented using the HTTP protocol. The other system needs to be able to handle two kinds of HTTP requests sent by Yesplan:
- “Take Action” requests, as sent when a user presses one of the action buttons in Yesplan; these carry data about which button was pressed, on which event or event group, and by which user
- “Configuration” requests, as sent when an administrator sets up the integration in Yesplan; these should be responded to with data about the possible states and possible actions
Additionally, the other system needs to send at least one kind of HTTP request to Yesplan in turn. After sending a “Take Action” request, Yesplan expects to receive an “Update State” request to tell it which new state to show in the custom data field.
This document assumes you are familiar with the HTTP protocol as documented in RFC 2616, and with the Yesplan HTTP API. Knowledge of Node.js and Express.js is needed to be able to run the example external system that is given, but this document can be understood without running the example.
Authentication§
New in Yesplan 32.17
The webhook module of Yesplan can authenticate using Basic Auth and OAuth 2.0, or use no authentication.
Basic Auth§
All requests include a header “Authorization” with the scheme “Basic”.
OAuth 2.0§
The authorization follows the OAuth 2.0 protocol:
- Yesplan obtains an access token from the authorization server. A separate URL can be configured for this API endpoint.
- All requests to the resources server then use the access token by including a header “Authorization” with the scheme “Bearer”.
- Yesplan currently supports the “Password Credentials” and “Client Credentials” grant types for obtaining the access token.
Tip
Read more about OAuth 2.0.
Example External System§
To illustrate the webhook mechanism, we provide an example of an external system implemented using Node.js and the Express.js framework. While the example implements a trivial, non-meaningful service, the code is fully functional and serves as a succinct illustration of how to use Yesplan’s webhooks.
The code for this example can be downloaded as a ZIP archive. The example consists of two files:
- package.json: the description of the dependencies of the example;
- server.js: the implementation of the webhook.
If you want to execute the webhook in combination with a Yesplan installation, you need to configure the file server.js in the following way:
- line 5: replace the value of the constant apiKey with a working API key of the Yesplan installation you integrate with;
- line 18: replace the value of url localhost:3000 with that of the URL of your server
Example States and Actions§
The example system is only meant to demonstrate the interaction with Yesplan. As such, it doesn’t do anything other than respond to “Take Action” requests by sending a corresponding “Update State” request where the new state is simply determined by the button the user pressed in Yesplan. The following states are defined with the corresponding buttons:
| State | Buttons | Description |
|---|---|---|
| OFF | Publish | Default state |
| Published | Update, Revoke | Event was registered with the webhook |
| Updated | Update, Error, Revoke | The event was updated by the webhook |
| Errored | Update | The webhook marked the event as being in an error state |
By clicking the Publish, Update or Error button, the user instructs the system to set the event to the state with the corresponding name. Clicking Revoke will inform the system that the user wishes to put the event in the OFF state.
Configuration in Yesplan§
The webhook needs to be set up in Yesplan by an administrator. As a Yesplan administrator, you can open the System Settings via the Dock. On the tab Integrations you can add a new integration (in our example, we called this integration “Webhook”). As the kind of integration in the dropdown select “Web Hook”. For the field “Configuration URL”, fill out the URL which Yesplan can use to send the “Configuration” request, as defined by the external system. For the example, the URL is http://external.system.com/configuration.
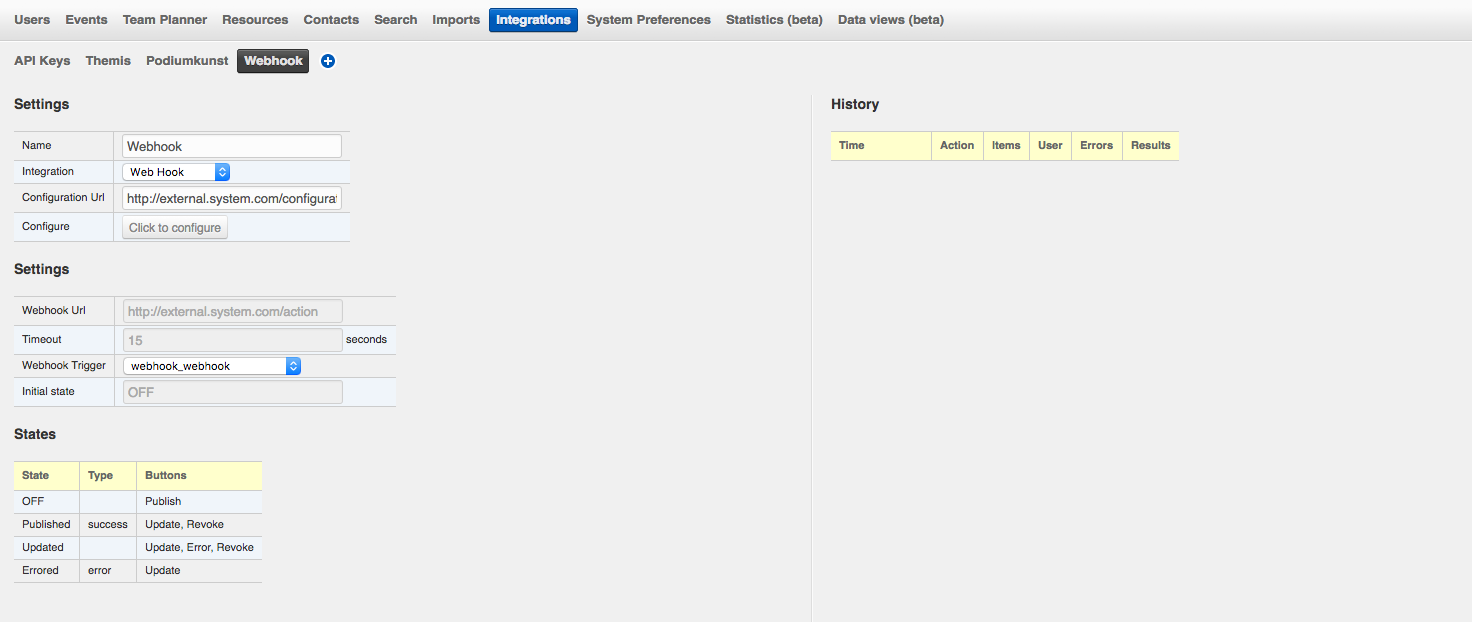
When the “Click to Configure” button is pressed, Yesplan will send the “Configuration” request using the URL given as the “Configuration URL”. The retrieved states and buttons, as well as the other configuration details, are shown. In case the response to the “Configuration” request is not as expected, an error message will be shown.
One other thing to set up is the integration custom data field. Setting up custom data fields is discussed in more detail in the chapter on “System Settings”. The custom data field needs to be of type “Publication trigger”. For this example, as shown on the screenshot below, the custom data field has label “webhook” and is made visible on the “Info” tab in event inspectors. In the settings for the integration, it is the field selected in the dropdown for the setting “Webhook Trigger”.

Using the Custom Data Field§
Actions can now be taken in the external system from within Yesplan. When an event is created in the Yesplan calendar, and opened, the custom data field labeled “webhook” is shown on the “Info” tab of the event inspector. For an event that has just been created, the field alwyas has the initial state as defined by external system in response to the “Configuration” request. In the example, this initial state is “OFF”, which offers “Publish” as the only button.

When the “Publish” button is clicked, Yesplan sends a “Take Action” request. Until a corresponding “Update State” request is received, the field is shown as being in a state “Waiting”. In our example, the external system in turn sends an “Update State” request that puts the field in the state “Published”.
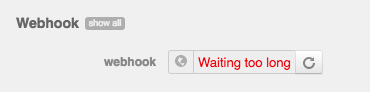
If the external service takes too long to send a corresponding “Update State” request, the field will be put in an error state “Waiting too long”. At this point, the user can try again by pressing the field’s refresh button. Yesplan will repeat the “Take Action” request that it sent before.
External System Requirements§
This section discusses the details of the “Configuration” and “Take Action” requests from Yesplan that an external system should be able to respond to, as well as the “Update State” requests it is expected to send. The details are illustrated using the same example that is used in the previous section to illustrate how the integration is set up and used.
Handling “Configuration” Requests§
The external system needs to be able to handle a “Configuration” request, and is expected to respond data about the possible states and actions. Technically, a “Configuration” request is a HTTP GET request on the “configuration” URL. The configuration URL is defined by the external system, and is set up in Yesplan by an administrator as discussed in the previous section. The response is expected to have status 200, with a JSON object with the following name/value pairs:
- url: the URL for “Take Action” requests that are sent by Yesplan each time a user clicks the button of one of the states defined by the webhook
- timeout: the amount of time, in seconds, that Yesplan should wait to receive back an “Update State” request, before informing the user that an action was not completed
- initialstate: the name of the initial state for the custom data field
- states: an array of states; each state is a separate JSON object with the following name/value pairs:
- name: the name of the state
- type: the type of state, which determines the color used to show it in Yesplan: either ‘success’ (shown in green) or ‘error’ (shown in red). This name/value pair can be omitted, the state is then shown in black.
- buttons: an array of strings, each string is the name of the button as it will appear in Yesplan
A few important points:
- The name of each state should be unique across all of the states
- The actions are not required to be unique, the same action can be offered to the user in multiple states
- The initial state must be one of the states defined in “states”
In the example code, the handling of “Configuration” requests from Yesplan is implemented as follows:
app.get('/configuration', function (req, res) {
  res.send( {
    url: "http://external.system.com/action",
    timeout: 15,
    initialstate: "OFF",
    states: [
        {
            name: "OFF",
            buttons: [ "Publish" ]
        },
        {
            name: "Published",
            type: "success",
            buttons: [ "Update", "Revoke" ]
        },
        {
            name: "Updated",
            buttons: [ "Update", "Error", "Revoke" ]
        },
        {
            name: "Errored",
            type: "error",
            buttons: [ "Update" ]
        },
    ]
  })
});
Handling “Take Action” Requests§
The external system needs to be able to handle a “Take Action” request. Yesplan sends a “Take Action” request when the user clicks one of the action buttons of the custom data field. Technically, a “Take Action” request is a HTTP POST request with a JSON object with data on the action the user is taking. The response is only expected to have status 200, as an indication that the request has been correctly received. The JSON object that is sent with a “Take Action” request has the following name/value pairs:
- subject: the object on which the user clicked the button. The ‘subject’ is a nested object with the following name/value pairs:
- url: the URL of the Yesplan HTTP resource representing the subject. This url can be used later on to update the state of the webhook publication trigger;
- id: the Yesplan identifier of the object on which the button was clicked;
- name: the name of the object on which the button was clicked;
- _type: the type of the kind of object on which the button was clicked. This can be either ‘event’ or ‘group’. For the distinction between both, and how custom data is inherited between groups and events, we refer to other parts of this manual;
- state: the current state of the webhook publication trigger field at the moment in time when the user clicked the button;
- button: the name of the button that was clicked;
- customdata: the keyword of the custom data field that contains the webhook publication trigger;
- user: a nested object containing information regarding which user has performed the click. This object consists of the following properties:
- url: the URL of the Yesplan HTTP resource representing the user;
- id: the Yesplan id of the user who clicked the button;
- name: the name of the user who clicked the button.
A few important points:
- The URL for “Take Action” requests is the URL given in the JSON object in response to the “Configuration” request.
- Yesplan only expects the response to have status 200, no other details are expected. However, Yesplan does expect to receive an “Update State” request in turn.
- The “time out” for the response is not the time out as given in the configuration. As the only immediately expected response is to acknowledge the request with a status 200 response, the response is expected to be given quickly. The configured “time out” is for the “Update State” request that is expected to be sent afterwards.
The following is an example of a “Take Action” request. The user pressed the “Update” button on an event named “Concert” where the custom data field is in the state “Published”:
POST http://external.system.com/action HTTP/1.1
Content-type: application/json
Content-Length: 301

{ "subject":
   { "url": "http://theater.yesplan.be/api/event/1179-1506667413",
     "id": "1179-1506667413",
     "name": "Concert",
     "_type": "event" },
  "state": "Published",
  "button": "Update",
  "customdata": "webhook_webhook",
  "user":
   { "url": "http://theater.yesplan.be/api/user/16-1506667364",
     "id": "16-1506667364",
     "name": "Administrator" } }
In the example code, the handling of “Take Action” requests from Yesplan is implemented as follows; being only an example, this implementation doesn’t do anything other than responding to the request with status 200 (“OK”) and sending the expected “Update State” request:
app.post('/action', function (req, res) {
    console.log(req.body);
    const button = req.body.button;
    const url = req.body.subject.url;
    const customdata = req.body.customdata;
    const targetState = buttonToStateMap[button];
    request
        .put(url + '/customdata')
        .query( { 'api_key': apiKey })
        .send( [ {
         "keyword": customdata,
         "value": targetState
        } ]).end( (err, success) => {
            if (err) {
                console.log("ERROR " + err);
            }
        });
    res.send("ok");
});
Sending “Update State” Requests§
After sending a “Take Action” request, Yesplan expects to receive a corresponding “Update State” request through the Yesplan HTTP API. An “Update State” request is a request from the external system for Yesplan to change the state of the integration custom data field. It is made in the same way as other requests to update Yesplan custom data fields, which is covered in more detail in the chapter on the Yesplan HTTP API. Technically, an “Update State” request is a HTTP PUT request with a JSON object that gives the new state of the integration custom data field.
The “Update State” request should correspond to the “Take Action” request by being about the same subject and the same custom data field. In the example “Take Action” request given in the previous section, the URL of the subject is http://theater.yesplan.be/api/event/1179-1506667413 and the keyword of the custom data field is “webhook_webhook”. The URL to be used for the corresponding “Update State” request is the same URL, but with “/customdata” appended as well as an API key. A complete example request that sets the state of the custom data field to “Updated” is as follows; example code that sends such a request is included in the previous section:
PUT /api/event/1179-1506667413/customdata?api_key=6F5A671121FB7123ECD3B3E3E8DBE7EE HTTP/1.1
Host: theater.yesplan.be
Accept: */*
Content-type: application/json
Content-Length: 50

[
    {
        "keyword": "webhook_webhook",
        "value": "Updated"
    }
]